Individual Assignment
✅
Write an application that interfaces a user with an input &/or output device that you made.
Group Assignment
✅
Compare as many tool options as possible.
Table of Contents
Hero Shot
Week 14 Work Plan

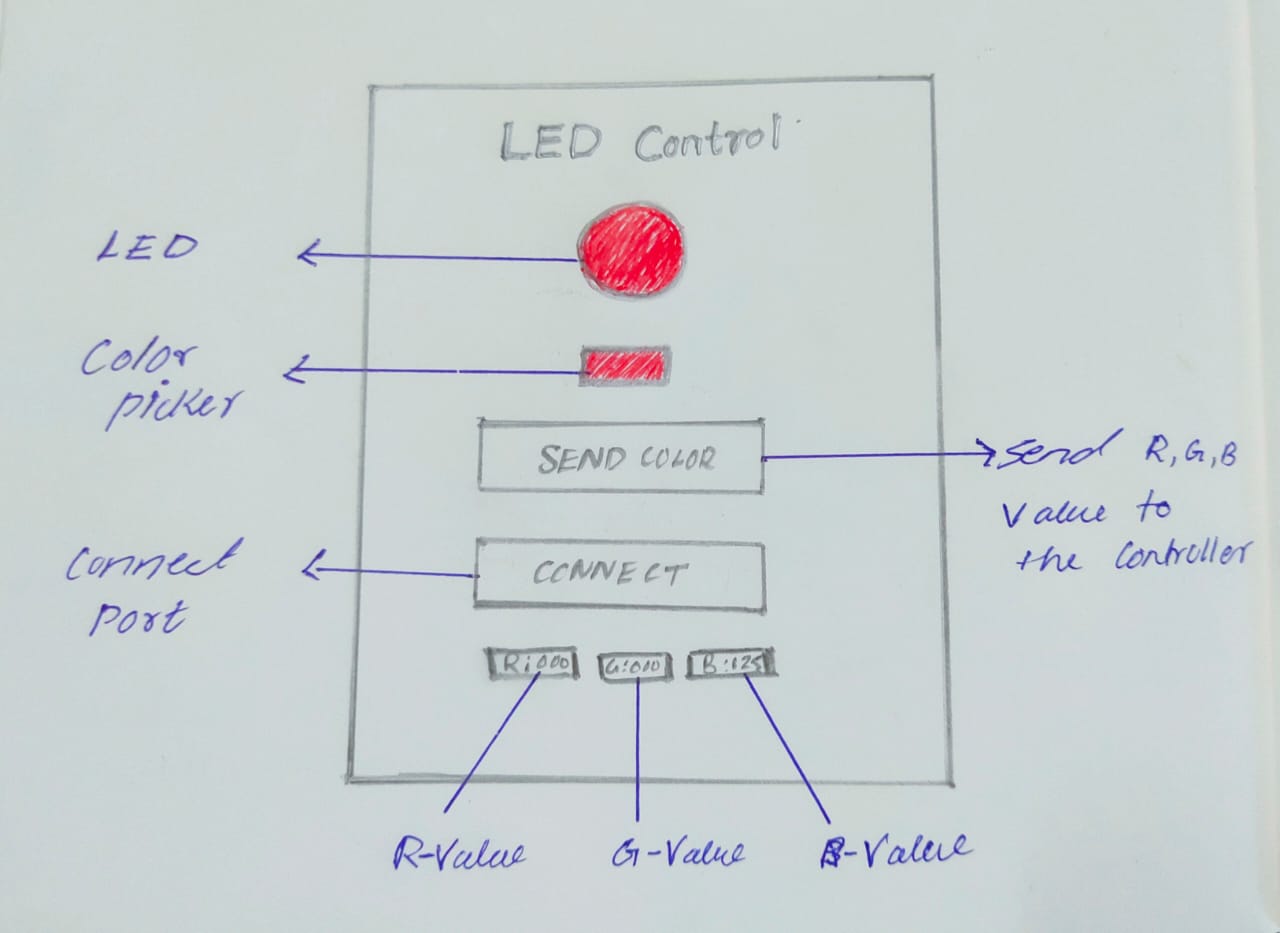
User Interface Idea
Creating the Plan
➡️
Step 1: Create a GUI or web app using HTML and CSS.
➡️
Step 2: Use JavaScript for web serial APIs.
➡️
Step 3: Programme the board to receive the data from the web serial API.
➡️
Step 4: Test and debug the code.
Web Serial API
📋
The Web Serial API is a JavaScript API that enables web applications to communicate with serial devices such as microcontrollers, Arduino boards, 3D printers, and other hardware that communicates via serial ports. It allows web applications to establish secure, low-level connections to serial devices, enabling bidirectional communication.
📋
With the Web Serial API, developers can create web applications that interact directly with hardware without requiring additional software installations or browser plugins. This opens up new possibilities for creating interactive experiences, IoT (Internet of Things) applications, and more, all within the web browser environment.
📋
The API provides methods for discovering available serial ports, connecting to a chosen port, reading from and writing to the port, and managing the connection state. It follows a promise-based asynchronous programming model, making it straightforward to use in modern web applications.
⬇️
Follow the link below to learn more about web serial API
Read from and write to a serial port | Capabilities | Chrome for Developers
The Web Serial API bridges the web and the physical world by allowing websites to communicate with serial devices.
 https://developer.chrome.com/docs/capabilities/serial
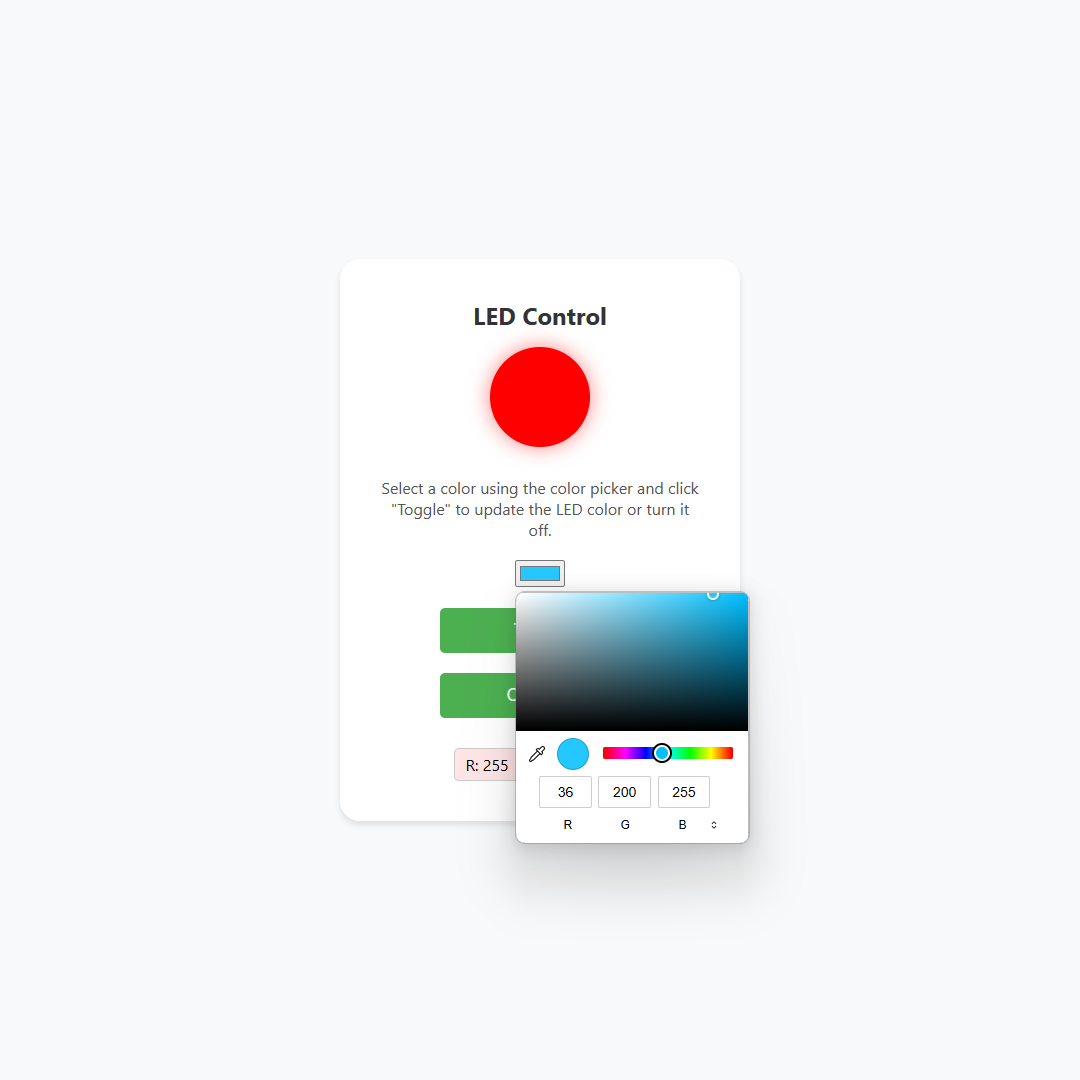
Color Picker GUI for RGB LED
🚨
This week I decided to build an app that could be useful for my final project. However, I found that it was trivial to build an app for my final project. My plan is to convert the online chess live game to offline. To do this, I need to use a very popular chess web app, such as chess.com or Lichess. Then I decided to do a color picker web app using a web serial API that changed the color of the RGB LED on my Eagle board, which I designed in week 8.
Board for Interfacing
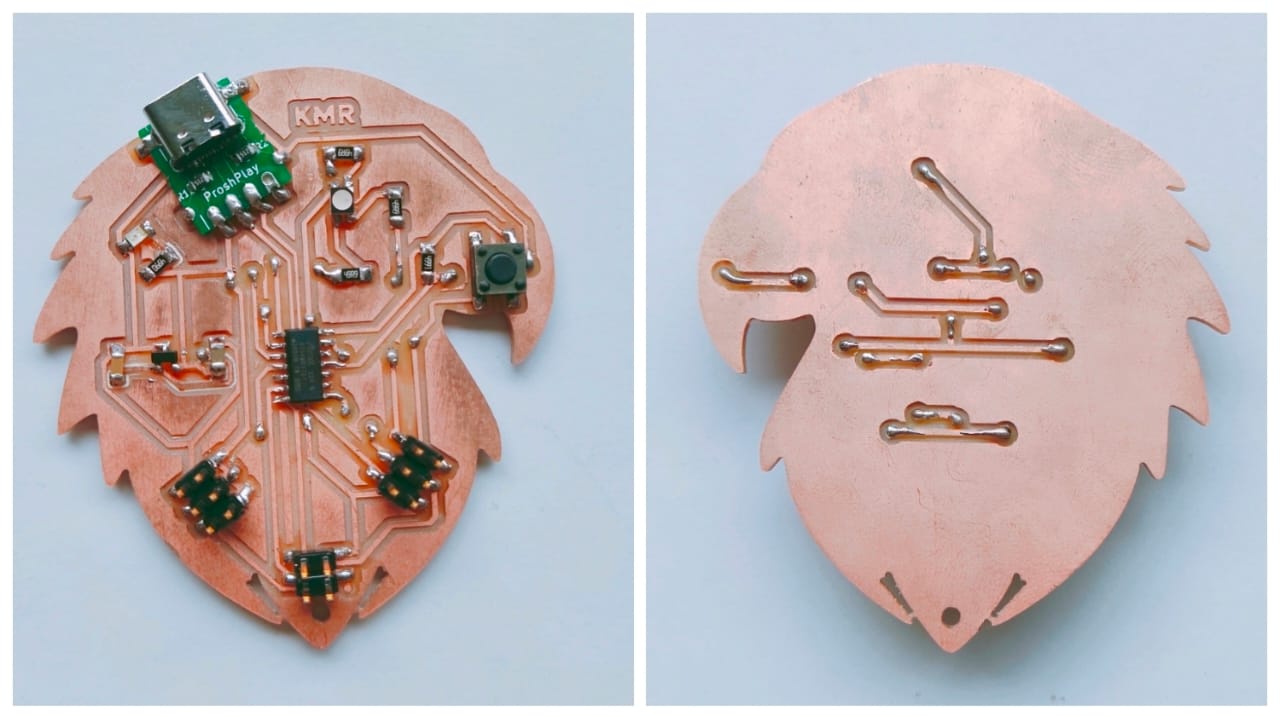
🚨
This week I decided to use my Eagle board, which provides an RGB LED for me. However, because I used the SAMD11C micro-controller to design this board, I needed to deal with the program memory effectively. I could learn how to program the board by optimizing the code's memory.
⬇️
Follow the link below to learn how to build my Eagle board.
Rayan Abdul Gafoor - Fab Academy
© 2024 Rayan Abdul Gafoor. All rights reserved. Students Agreement.
Programming the Eagle Board
#define redPin 5
#define greenPin 8
#define bluePin 9


char c;
String s;
void setup() {
  Serial.begin(9600);
  pinMode(redPin, OUTPUT);
  pinMode(greenPin, OUTPUT);
  pinMode(bluePin, OUTPUT);
  digitalWrite(redPin, HIGH);
  digitalWrite(greenPin, HIGH);
  digitalWrite(bluePin, HIGH);
}

void loop() {
  if (Serial.available() > 0) {
     c = Serial.read();

     s = s+c;
            // Serial.println(c);

    if (c == '\n')
    {
      int value = (s[1]-48)*100+(s[2]-48)*10+(s[3]-48);
       value = 256 - value;
      if(s[0] == 'r')
      {
        // Serial.println(value);
        analogWrite(redPin, value);
      }
      if(s[0] == 'g')
      {
        // Serial.println(value);
        analogWrite(greenPin, value);
      }
      if(s[0] == 'b')
      {
        // Serial.println(value);
        analogWrite(bluePin, value);
      }
      s ="";
    }
  }
}
User Interface
Web Interface Source Code
<!DOCTYPE html>
<html lang="en">
<head>
<meta charset="UTF-8">
<meta name="viewport" content="width=device-width, initial-scale=1.0">
<title>LED Control</title>
<style>
  /* Global styles */
  body {
    font-family: 'Segoe UI', Tahoma, Geneva, Verdana, sans-serif;
    margin: 0;
    padding: 0;
    background-color: #f8f9fa;
    display: flex;
    align-items: center;
    justify-content: center;
    height: 100vh;
  }

  /* Container styles */
  .container {
    text-align: center;
    background-color: #fff;
    border-radius: 20px;
    box-shadow: 0 4px 6px rgba(0, 0, 0, 0.1);
    padding: 40px;
    max-width: 320px;
    width: 100%;
  }

  /* LED styles */
  .led {
    width: 100px;
    height: 100px;
    background-color: red; /* Default color when off */
    border-radius: 50%;
    box-shadow: 0 0 20px rgba(255, 0, 0, 0.5);
    transition: background-color 0.3s ease; /* Smooth transition when changing color */
    margin: 0 auto 30px; /* Center LED horizontally */
  }

  /* Button styles */
  button {
    padding: 12px 24px;
    font-size: 18px;
    background-color: #4CAF50; /* Green */
    color: white;
    border: none;
    border-radius: 5px;
    cursor: pointer;
    transition: background-color 0.3s ease;
    outline: none;
    margin-bottom: 20px;
    width: 100%;
    max-width: 200px;
  }

  button:hover {
    background-color: #45a049; /* Darker green on hover */
  }

  h1 {
    margin-top: 0;
    color: #333;
    font-size: 24px;
  }

  p {
    margin: 0 0 20px;
    color: #555;
    font-size: 16px;
  }

  .colorBox {
    border: 1px solid #ccc;
    border-radius: 5px;
    padding: 5px 10px;
    margin-top: 10px;
    display: inline-block;
  }

  #redBox {
    background-color: rgba(255, 0, 0, 0.1);
  }

  #greenBox {
    background-color: rgba(0, 255, 0, 0.1);
  }

  #blueBox {
    background-color: rgba(0, 0, 255, 0.1);
  }
</style>
</head>
<body>

<div class="container">
  <h1>LED Control</h1>
  <div id="led" class="led"></div> <!-- LED representation -->
  <p>Select a color using the color picker and click "Toggle" to update the LED color or turn it off.</p>
  <input type="color" id="colorPicker" onchange="changeColor()" value="#ff0000"> <br><br><!-- Color picker for RGB LED -->
  <button onclick="toggleSend()" id="send">Toggle</button> <!-- Toggle button -->
  <button onclick="connectDevice()" id="connect">Connect</button> <br><!-- Connect button -->
  <!-- Boxes to display RGB color values -->
  <div id="redBox" class="colorBox">R: <span id="redValue">255</span></div>
  <div id="greenBox" class="colorBox">G: <span id="greenValue">0</span></div>
  <div id="blueBox" class="colorBox">B: <span id="blueValue">0</span></div>
</div>


<script>
  let port;
  let isToggled = false;
  let receivedText = '';
  document.getElementById('connect').addEventListener('click', async () => {
      port = await navigator.serial.requestPort();
      await port.open({ baudRate: 9600 });
      const reader = port.readable.getReader();

      const processMsg = async () => {
          const decoder = new TextDecoder();
          const { value, done } = await reader.read();
          if (!done) {
              receivedText += decoder.decode(value);
              document.getElementById('serial').value = receivedText;
              processMsg();
          } else {
              reader.releaseLock();
          }
      }
      processMsg();
  });

  async function toggleSend() {
    if (!port) {
      console.error('Serial port not connected.');
      return;
    }

    if (isToggled) {
      const data = `000,000,000\n`; // Sending all zeros to turn off LED
      console.log('Turning off LED');
      const writer = port.writable.getWriter();
      await writer.write(new TextEncoder().encode(data));
      writer.releaseLock();
      isToggled = false;
    } else {
      sendColor();
      isToggled = true;
    }
  }

  async function sendColor() {
    const colorPicker = document.getElementById("colorPicker");
    const color = colorPicker.value;
    const rgb = hexToRgb(color);
    // const data = `${rgb.r},${rgb.g},${rgb.b}\n`;
    const rdata = `${rgb.r}\n`;
    const rn='r'
    rrdata=rn.concat(rdata);
    const gdata = `${rgb.g}\n`;
    const gn='g'
    ggdata=gn.concat(gdata);
    const bdata = `${rgb.b}\n`;
    const bn='b'
    bbdata=bn.concat(bdata);
    // const data = 'r255';
    console.log('Sending:', ggdata);
    const writer = port.writable.getWriter();
    await writer.write(new TextEncoder().encode(ggdata));
    await writer.write(new TextEncoder().encode(rrdata));
    await writer.write(new TextEncoder().encode(bbdata));
    writer.releaseLock();
  }

  function changeColor() {
    const colorPicker = document.getElementById("colorPicker");
    const color = colorPicker.value;

    // Update LED color
    const led = document.getElementById("led");
    led.style.backgroundColor = color;

    // Display RGB values
    const rgb = hexToRgb(color);
    document.getElementById("redValue").innerText = rgb.r;
    document.getElementById("greenValue").innerText = rgb.g;
    document.getElementById("blueValue").innerText = rgb.b;
  }

  function hexToRgb(hex) {
    // Remove '#' if present
    hex = hex.replace(/^#/, '');

    // Convert hex to RGB
    const bigint = parseInt(hex, 16);
    const r = (bigint >> 16) & 255;
    const g = (bigint >> 8) & 255;
    const b = bigint & 255;

    // Pad with leading zeros if needed
    const paddedR = ('00' + r).slice(-3);
    const paddedG = ('00' + g).slice(-3);
    const paddedB = ('00' + b).slice(-3);

    return { r: paddedR, g: paddedG, b: paddedB };
}
</script>

</body>
</html>
🚨
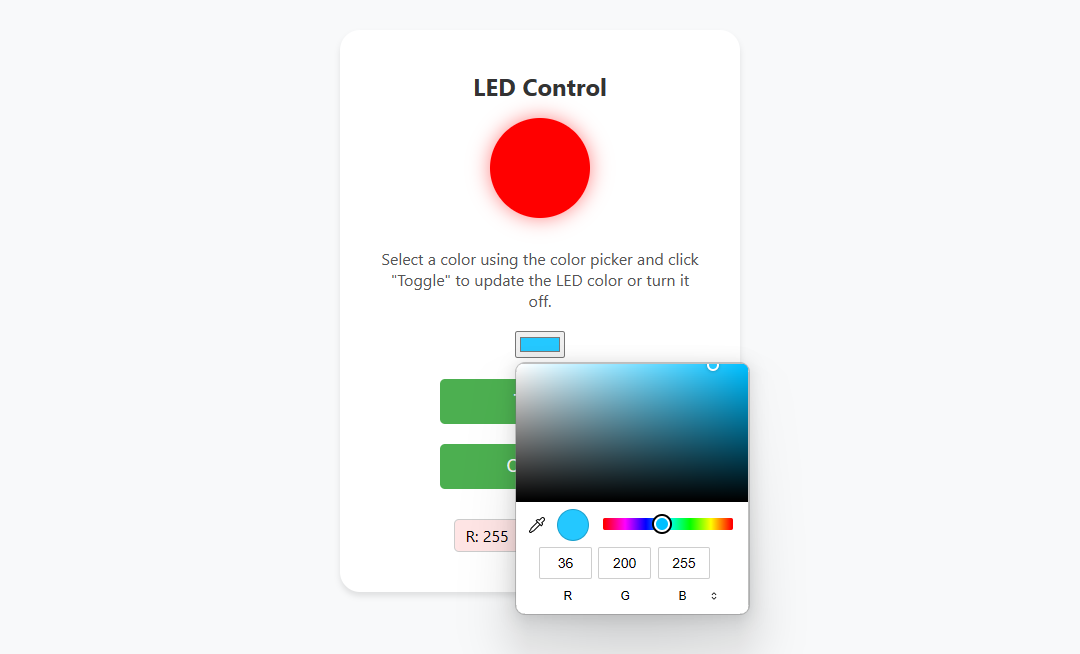
I made this user interface using HTML and CSS. Initially, I used ChatGPT to obtain the code. I then edited the code to convert it into my desired design. Finally, I debugged the code to ensure a well-functioning user interface.
🚨
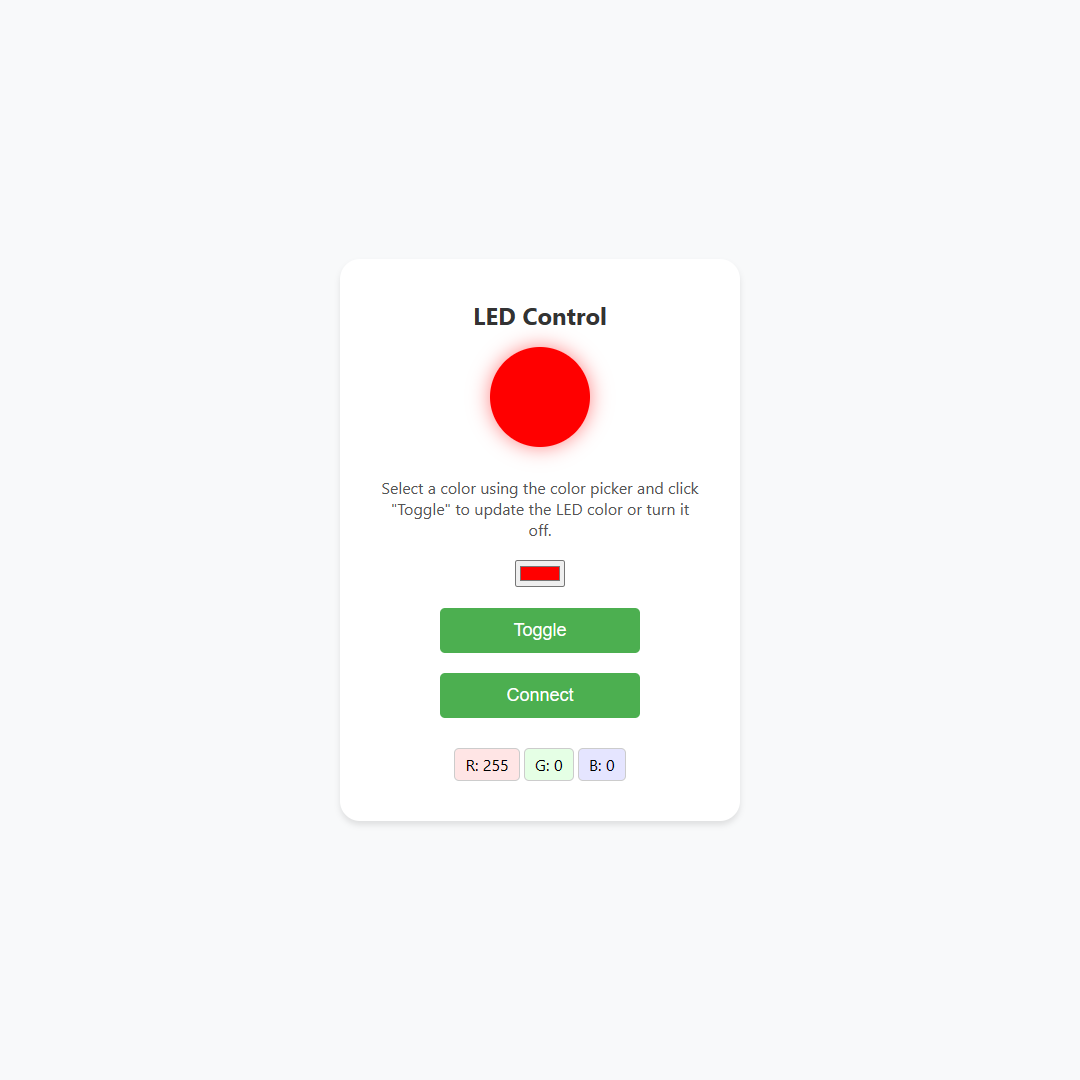
Final Result 👇
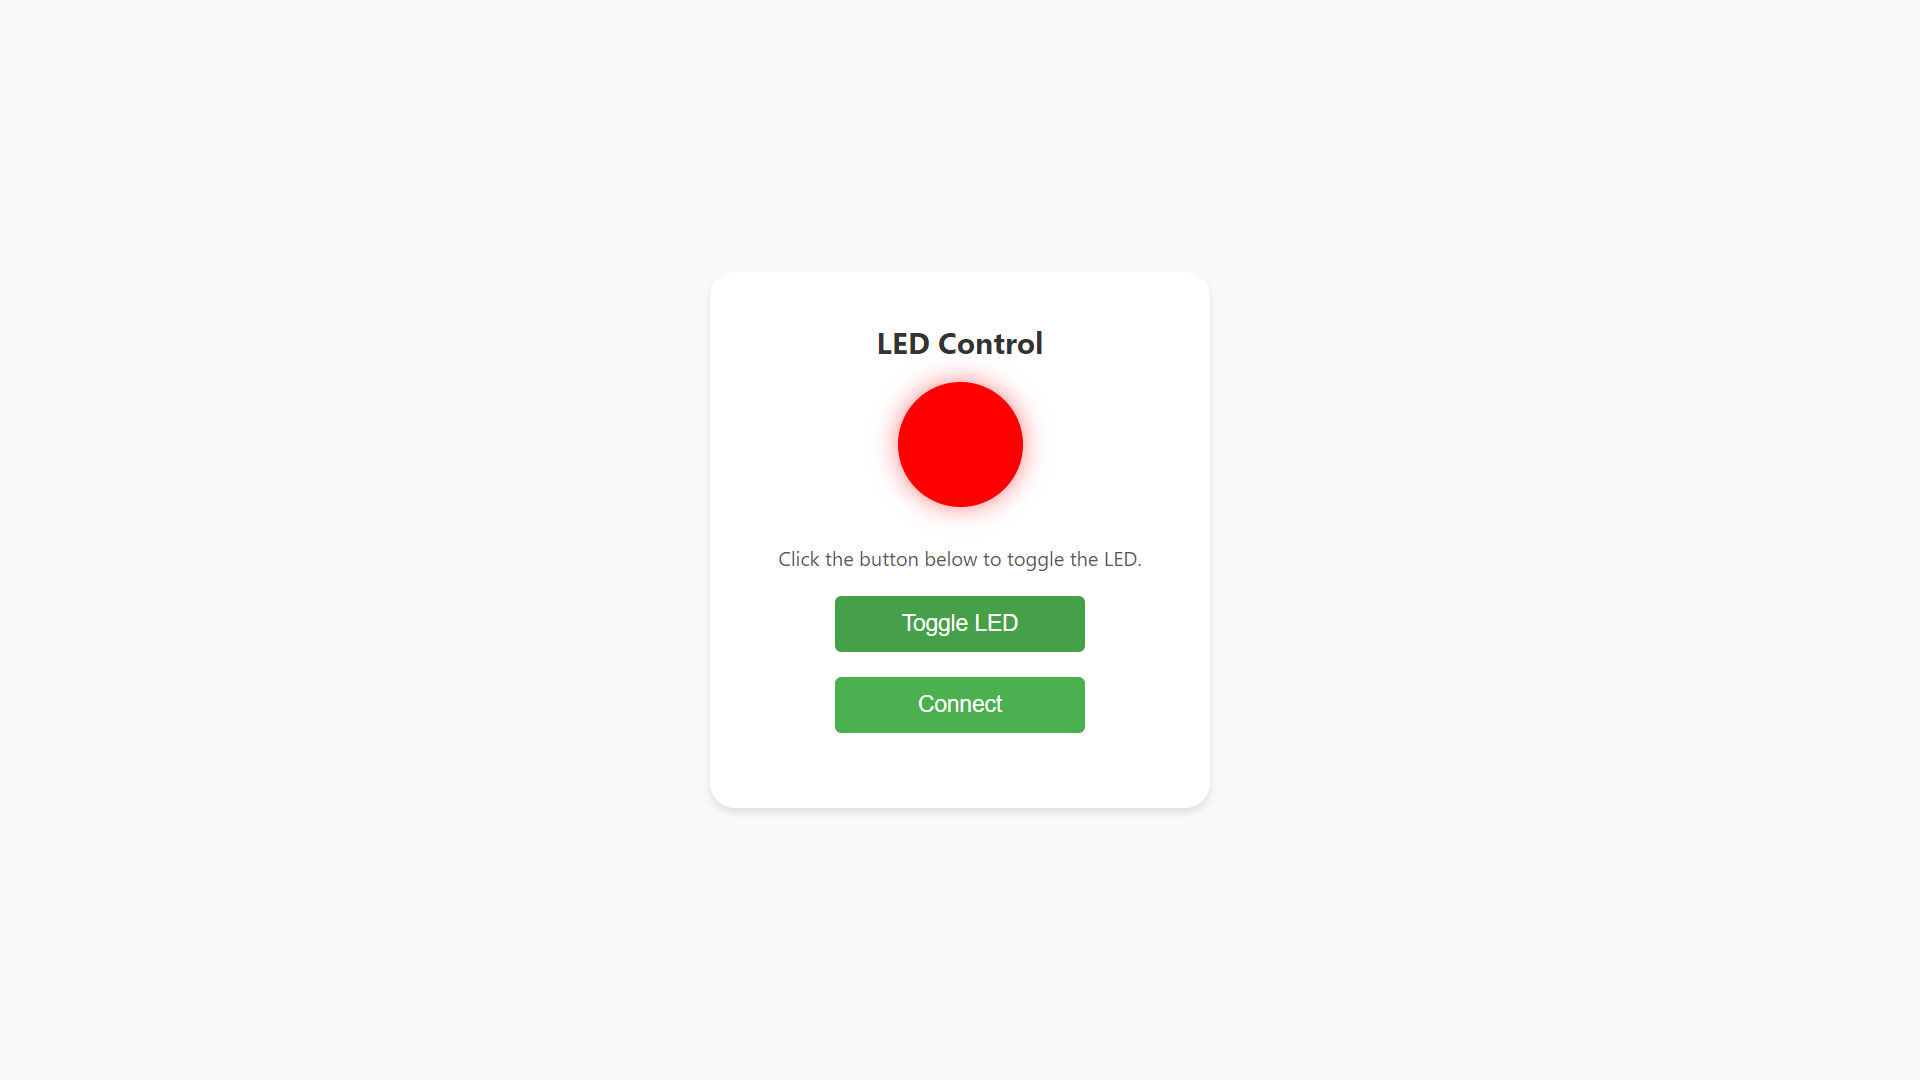
XIAO RP2040 Board
🚨
I also tried to turn on and off the LED on the XIAO RP2040 QT board from week 4.
<!DOCTYPE html>
<html lang="en">
<head>
<meta charset="UTF-8">
<meta name="viewport" content="width=device-width, initial-scale=1.0">
<title>LED Control</title>
<style>
  /* Global styles */
  body {
    font-family: 'Segoe UI', Tahoma, Geneva, Verdana, sans-serif;
    margin: 0;
    padding: 0;
    background-color: #f8f9fa;
    display: flex;
    align-items: center;
    justify-content: center;
    height: 100vh;
  }

  /* Container styles */
  .container {
    text-align: center;
    background-color: #fff;
    border-radius: 20px;
    box-shadow: 0 4px 6px rgba(0, 0, 0, 0.1);
    padding: 40px;
    max-width: 320px;
    width: 100%;
  }

  /* LED styles */
  .led {
    width: 100px;
    height: 100px;
    background-color: red; /* Default color when off */
    border-radius: 50%;
    box-shadow: 0 0 20px rgba(255, 0, 0, 0.5);
    transition: background-color 0.3s ease; /* Smooth transition when changing color */
    margin: 0 auto 30px; /* Center LED horizontally */
  }

  /* Button styles */
  button {
    padding: 12px 24px;
    font-size: 18px;
    background-color: #4CAF50; /* Green */
    color: white;
    border: none;
    border-radius: 5px;
    cursor: pointer;
    transition: background-color 0.3s ease;
    outline: none;
    margin-bottom: 20px;
    width: 100%;
    max-width: 200px;
  }

  button:hover {
    background-color: #45a049; /* Darker green on hover */
  }

  h1 {
    margin-top: 0;
    color: #333;
    font-size: 24px;
  }

  p {
    margin: 0 0 20px;
    color: #555;
    font-size: 16px;
  }
</style>
<script>
  function toggleLED() {
    var led = document.getElementById("led");
    if (led.style.backgroundColor === "red") {
      led.style.backgroundColor = "green"; // Change LED color to green (on)
    } else {
      led.style.backgroundColor = "red"; // Change LED color to red (off)
    }
  }

  function connectDevice() {
    // Functionality for connecting to the device goes here
    alert("Connecting to the device...");
  }
</script>

</head>
<body>

<div class="container">
  <h1>LED Control</h1>
  <div id="led" class="led"></div> <!-- LED representation -->
  <p>Click the button below to toggle the LED.</p>
  <button onclick="toggleLED()" id="toggle">Toggle LED</button>
  <button onclick="connectDevice()" id="connect">Connect</button> <!-- Connect button -->
</div>
<script>
  let port;
  let isToggled = false;
  let receivedText = '';
  document.getElementById('connect').addEventListener('click', async () => {
      port = await navigator.serial.requestPort();
      await port.open({ baudRate: 9600 });
      const reader = port.readable.getReader();

      const processMsg = async () => {
          const decoder = new TextDecoder();
          const { value, done } = await reader.read();
          if (!done) {
              receivedText += decoder.decode(value);
              document.getElementById('serial').value = receivedText;
              processMsg();
          } else {
              reader.releaseLock();
          }
      }
      processMsg();
  });

  document.getElementById('toggle').addEventListener('click', async () => {
      const encoder = new TextEncoder()
      const writer = port.writable.getWriter();
      const dataToSend = isToggled ? '1' : '0';
      isToggled = !isToggled;
      writer.write(encoder.encode(dataToSend)).then(() => {
          console.log("Sent: " + dataToSend);
      });
      writer.releaseLock();
  });
</script>
</body>
</html>
int LED = 2;
void setup() {
// put your setup code here, to run once:
pinMode(LED, OUTPUT);
Serial.begin(9600);
}
void loop() {
// put your main code here, to run repeatedly:
if (Serial.available() > 0) {
// read the incoming byte for toggling the LED:
char character = Serial.read();
if (character == '1')
{
digitalWrite(LED, HIGH);
Serial.println("The LED is now ON");
} if (character == '0') {
digitalWrite(LED, LOW);
Serial.println("The LED is now OFF");
}
}
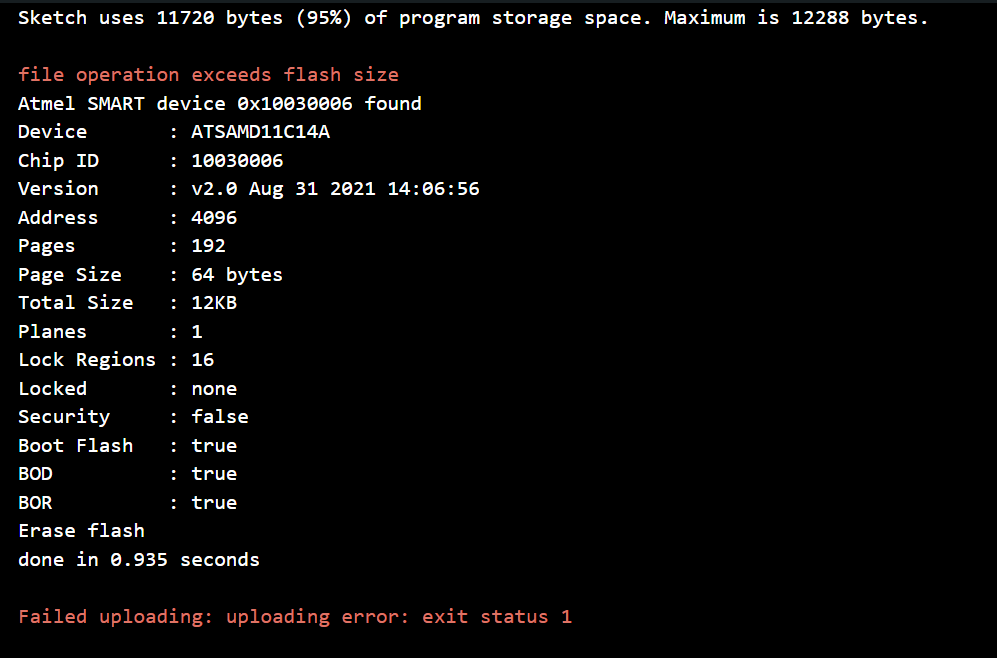
}Challenges
Code exceeds the flash size
🚨
Initially, I was not very bothered about the size of the microcontroller, so I wrote the code normally, but I realised that the memory capability of the samd11c was limited, and I had to reduce the storage space of the code by optimising it.
The Arduino IDE is displaying a device not found on the port error
🚨
While programming the board, I fixed few logical errors and I tried to upload the code to the Eagle board I the got a device not found on the port error. I ensured that I selected the port, but still, I am getting the same error message. I discovered that the port is already connected to the browser, and I realised that when the port is connected to any other IDE or web browser, it won't open in another IDE. So I disconnected the port from my web browser, and it solved the issue.

Group Assignment Page
📌
For the group documentation page click here.
Reference
📌 Joshwin
Resources and Downloads
📁 User Interface Original Source Code